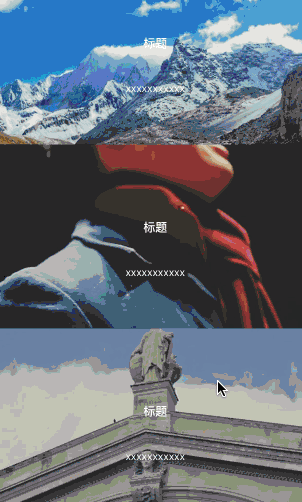
"今天在CocoaChina上看到一个非常好的效果,作者:juvham 代码实力强劲,用了很多高效的方法,但是注释太少。。所以我在他的基础上分离出了我最喜欢的一个效果,改了一部分代码,加上注释,希望大家能喜欢。。先上我分离出来的效果图:"
##这个效果是如何实现的
- 首先你需要创建一个UITableView
- 然后自定义一个UITableViewCell,例:myCell.h
- 在myCell.h中创建几个成员变量:
/**
*  图片imgView
*/
@property (nonatomic, strong) UIImageView * pictureView;

/**
*  标题label
*/
@property (nonatomic, strong) UILabel * titleLabel;

/**
*  内容Label
*/
@property (nonatomic, strong) UILabel * littleLabel;- 实现它们
- (instancetype)initWithStyle:(UITableViewCellStyle)style reuseIdentifier:(NSString *)reuseIdentifier
{
    if ([super initWithStyle:style reuseIdentifier:reuseIdentifier]) {


        //取消选中效果
        self.selectionStyle = UITableViewCellSeparatorStyleNone;

        //裁剪看不到的
        self.clipsToBounds = YES;

        //pictureView的Y往上加一半cellHeight 高度为2 * cellHeight,这样上下多出一半的cellHeight
        _pictureView = ({
            UIImageView * picture = [[UIImageView alloc]initWithFrame:CGRectMake(0, -cellHeight/2, kWidth, cellHeight * 2)];

            picture.contentMode = UIViewContentModeScaleAspectFill;

            picture;
        });
        [self.contentView  addSubview:_pictureView];

        _titleLabel = ({
            UILabel * titleLabel = [[UILabel alloc]initWithFrame:CGRectMake(0, cellHeight / 2 - 30, kWidth, 30)];

            titleLabel.font = [UIFont boldSystemFontOfSize:16];

            titleLabel.textAlignment = NSTextAlignmentCenter;

            titleLabel.textColor = [UIColor whiteColor];

            titleLabel.text = @"标题";

            titleLabel;
        });
        [self.contentView addSubview:_titleLabel];

        _littleLabel = ({
            UILabel * littleLabel = [[UILabel alloc]initWithFrame:CGRectMake(0, cellHeight / 2 + 30, kWidth, 30)];

            littleLabel.font = [UIFont systemFontOfSize:14];

            littleLabel.textAlignment = NSTextAlignmentCenter;

            littleLabel.textColor = [UIColor whiteColor];

            littleLabel.text = @"xxxxxxxxxxx";

            littleLabel;

        });
        [self.contentView addSubview:_littleLabel];


    }
    return self;

}- 然后我们需要一个方法,让cell上的_pictureView得到image
- (void)setImg:(UIImage *)img
{
    self.pictureView.image = img;
}- 在willDisplayCell方法中处理数据,能优化滑动性能
- (void)tableView:(UITableView *)tableView willDisplayCell:(UITableViewCell *)cell forRowAtIndexPath:(NSIndexPath *)indexPath
{
    MyCell * myCell = (MyCell *)cell;

    [myCell setImg:_dataArray[indexPath.row]];

    [myCell cellOffset];
}
这里出现的[myCell cellOffset]是后面再讲的cell位移方法,这里先当作没看到。。
- 数据都处理完了,现在来讲重点的滑动方法
- (void)scrollViewDidScroll:(UIScrollView *)scrollView
{
    // visibleCells 获取界面上能显示出来了cell
    NSArray<MyCell *> *array = [self.tableView visibleCells];

    //enumerateObjectsUsingBlock 类似于for,但是比for更快
    [array enumerateObjectsUsingBlock:^(MyCell * _Nonnull obj, NSUInteger idx, BOOL * _Nonnull stop) {

        [obj cellOffset];

    }];
}
这里的方法很有用,可以记一下,而enumerateObjectsUsingBlock有人测试过,会比for快4ms左右,要是你对它有更好的理解,欢迎评论告诉我。
- 现在来讲cellOffset方法
- (CGFloat)cellOffset
{
    /*
    - (CGRect)convertRect:(CGRect)rect toView:(nullable UIView *)view;
    将rect由rect所在视图转换到目标视图view中,返回在目标视图view中的rect
    这里用来获取self在window上的位置
    */
    CGRect toWindow = [self convertRect:self.bounds toView:self.window];

    //获取父视图的中心
    CGPoint windowCenter = self.superview.center;

    //cell在y轴上的位移  CGRectGetMidY之前讲过,获取中心Y值
    CGFloat cellOffsetY = CGRectGetMidY(toWindow) - windowCenter.y;

    //位移比例
    CGFloat offsetDig = 2 * cellOffsetY / self.superview.frame.size.height ;

    //要补偿的位移
    CGFloat offset =  -offsetDig * cellHeight/2;

    //让pictureViewY轴方向位移offset
    CGAffineTransform transY = CGAffineTransformMakeTranslation(0,offset);
    self.pictureView.transform = transY;

    return offset;
}
这里主要是cellOffsetY很重要,这个参数获取了cell的中心与父视图中心的位移差,然后位移cell上的pictureView。
这个动画就完成了.
代码
我的代码(基础不是很好的可以先看看我的..注释写的很详细)
原作者juvham的代码(里面还有更多效果,就是有点难看懂)
好文推荐:iOS开发之详解连连支付集成