
"从今天起(2016.1.28),我将仿做一个微信,不过因为只有晚上能写点自己的东西,所以进度可能不快,请大家谅解!:"

今天完成的部分
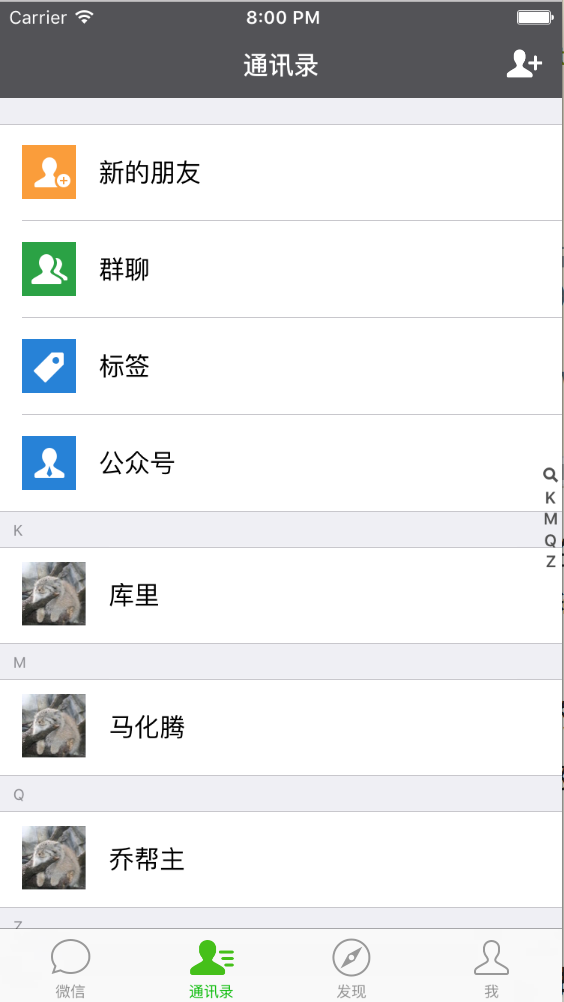
- 搭建通讯录页面的UI(除搜索栏)
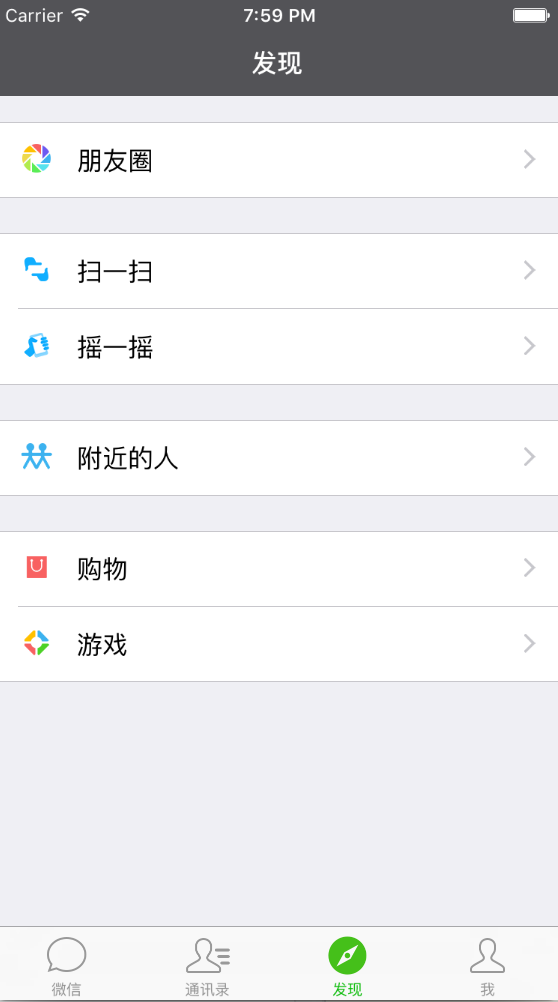
- 搭建发现页面的UI
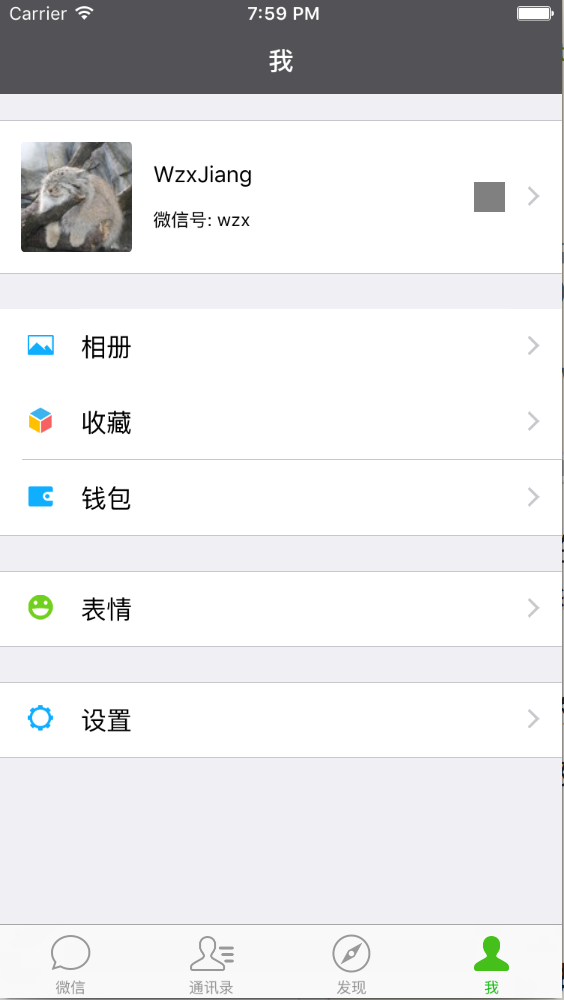
- 搭建我页面的UI
效果图(6及6plus的模拟器1/3倍情况下可能会看不到cell的分割线):
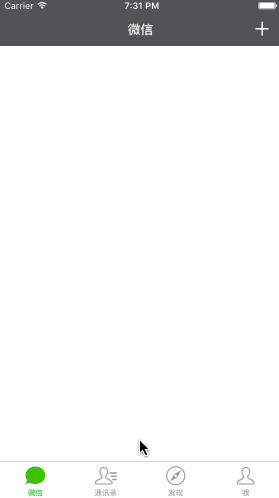
有一张图还是缺的。。
微信比QQ的BUG少太多,原因就在于它很多组件都是原生的,所以我今天在搭这三个页面的时候尽量使用了原生组件(当然不是为了偷懒..) 另外,今天在为了方便的情况下还是加了个pch文件..大家要是源码下下来无法使用,请修改一下这个地址:
pch文件中的宏定义
//按比例获取高度
#define  WGiveHeight(HEIGHT) HEIGHT * [UIScreen mainScreen].bounds.size.height/568.0

//按比例获取宽度
#define  WGiveWidth(WIDTH) WIDTH * [UIScreen mainScreen].bounds.size.width/320.0

//RGB色值
#define UIColorFromRGB(rgbValue) [UIColor \
colorWithRed:((float)((rgbValue & 0xFF0000) >> 16))/255.0 \
green:((float)((rgbValue & 0xFF00) >> 8))/255.0 \
blue:((float)(rgbValue & 0xFF))/255.0 alpha:1.0]
接下来讲解今天做的内容
- 先从最简单的发现页面讲起
@interface FoundViewController ()<UITableViewDelegate,UITableViewDataSource>

@property(nonatomic,strong)UITableView * tableView;

//名字数组
@property(nonatomic,copy)NSArray * dataArr;

//图片数组
@property(nonatomic,copy)NSArray * imgArr;


//准备数据
- (void)preData
{

_dataArr = @[@[@"朋友圈"],
@[@"扫一扫",@"摇一摇"],
@[@"附近的人"],
@[@"购物",@"游戏"]];

_imgArr = @[@[@"found_quan"],
@[@"found_saoyisao",@"found_yao"],
@[@"found_nearby"],
@[@"found_shop",@"found_game"]];

}
//创建tableView
- (void)createTableView
{
    _tableView = ({
        UITableView * tableView = [[UITableView alloc]initWithFrame:CGRectMake(0, 64, self.view.frame.size.width, self.view.frame.size.height - 64 - 44) style:UITableViewStyleGrouped];

        tableView.delegate = self;

        tableView.dataSource = self;

        //调整下分隔线位置
        tableView.separatorInset = UIEdgeInsetsMake(0, 0, 0, 0);

        tableView;
    });
    [self.view addSubview:_tableView];
}
#pragma mark --tableView--
//组数
-(NSInteger)numberOfSectionsInTableView:(UITableView *)tableView
{
    return _dataArr.count;
}

//每组个数
- (NSInteger)tableView:(UITableView *)tableView numberOfRowsInSection:(NSInteger)section
{
    NSArray * rowArr = _dataArr[section];
    return rowArr.count;
}

- (UITableViewCell *)tableView:(UITableView *)tableView cellForRowAtIndexPath:(NSIndexPath *)indexPath
{
    static NSString * identifier = @"foundCell";

    UITableViewCell * cell = [tableView dequeueReusableCellWithIdentifier:identifier];

    if (cell == nil)
    {
        cell = [[UITableViewCell alloc]initWithStyle:UITableViewCellStyleDefault reuseIdentifier:identifier];
        //右侧小箭头
        cell.accessoryType=UITableViewCellAccessoryDisclosureIndicator;
    }

    return cell;
}

//养成习惯在WillDisplayCell中处理数据
- (void)tableView:(UITableView *)tableView willDisplayCell:(UITableViewCell *)cell forRowAtIndexPath:(NSIndexPath *)indexPath
{
    cell.imageView.image = [UIImage imageNamed:_imgArr[indexPath.section][indexPath.row]];
    cell.textLabel.text = _dataArr[indexPath.section][indexPath.row];
}

//设置row高度
- (CGFloat)tableView:(UITableView *)tableView heightForRowAtIndexPath:(NSIndexPath *)indexPath
{
    return WGiveHeight(43);
}

//设置头视图高度
- (CGFloat)tableView:(UITableView *)tableView heightForHeaderInSection:(NSInteger)section
{
    if (section == 0)
    {
        return WGiveHeight(15);
    }
    return WGiveHeight(10);
}

//设置脚视图高度
- (CGFloat)tableView:(UITableView *)tableView heightForFooterInSection:(NSInteger)section
{
    return WGiveHeight(10);
}
这个界面实在是太简单了,大家就着注释看看代码就懂了..
注意一点的就是数据处理尽量在WillDisplayCell方法里面处理
不得不说这种原生的UITableViewStyleGrouped真是又方便又美观.
- 我页面的搭建(缺了个二维码的图)
这里大部分代码和上面一致,除了第一个cell要获取网络数据(网络部分后面再加)以及第一个cell不得不自己创建了一个,要是你有原生能够完成的做法,一定要教我..
1 创建了一个PersonModel
/**
*  用户头像
*/
@property (nonatomic,copy)NSString * avater;

/**
*  用户昵称
*/
@property (nonatomic,copy)NSString * nickName;

/**
*  微信号
*/
@property (nonatomic,copy)NSString * weID;
2 创建的cell(尽量不使用xib)
#import "PersonModel.h"
/**
*  model
*/
@property(nonatomic,strong)PersonModel * model;

/**
*  用户头像ImgView
*/
@property (nonatomic,strong)UIImageView * avaterImgView;

/**
*  用户名Label
*/
@property (nonatomic,strong)UILabel * userNameLabel;

/**
*  微信号Label
*/
@property (nonatomic,strong)UILabel * weIDLabel;

/**
*  二维码ImgView
*/
@property (nonatomic,strong)UIImageView * wmImgView;
- (void)setModel:(PersonModel *)model;
- (void)setModel:(PersonModel *)model
{
self.accessoryType = UITableViewCellAccessoryDisclosureIndicator;
self.avaterImgView.image = [UIImage imageNamed:model.avater];
self.userNameLabel.text = model.nickName;
self.weIDLabel.text = [NSString stringWithFormat:@"微信号: %@",model.weID];
self.wmImgView.image = [UIImage imageNamed:@""];
self.wmImgView.backgroundColor = [UIColor grayColor];
}
//懒加载
- (UIImageView *)avaterImgView
{
if (!_avaterImgView)
{
_avaterImgView = ({
UIImageView * avaterImgView = [[UIImageView alloc]initWithFrame:CGRectMake(WGiveWidth(12), WGiveHeight(12), self.frame.size.height - 2*WGiveHeight(12), self.frame.size.height - 2*WGiveHeight(12))];
avaterImgView.clipsToBounds = YES;
//加点圆角
avaterImgView.layer.cornerRadius = 3;
avaterImgView;
});
[self addSubview:_avaterImgView];
}
return _avaterImgView;
}
- (UILabel *)userNameLabel
{
if (!_userNameLabel)
{
_userNameLabel = ({
UILabel * userNameLabel = [[UILabel alloc]initWithFrame:CGRectMake(self.frame.size.height - 2*WGiveHeight(12) + 2*WGiveWidth(12), WGiveHeight(19), WGiveWidth(160), WGiveHeight(22))];
userNameLabel.font = [UIFont systemFontOfSize:15];
userNameLabel;
});
[self addSubview:_userNameLabel];
}
return _userNameLabel;
}
- (UILabel *)weIDLabel
{
if (!_weIDLabel)
{
_weIDLabel = ({
UILabel * weIDLabel = [[UILabel alloc]initWithFrame:CGRectMake(self.frame.size.height - 2*WGiveHeight(12) + 2*WGiveWidth(12), _userNameLabel.frame.origin.y + _userNameLabel.frame.size.height + WGiveHeight(5), WGiveWidth(160), WGiveHeight(20))];
weIDLabel.font = [UIFont systemFontOfSize:12];
weIDLabel;
});
[self addSubview:_weIDLabel];
}
return _weIDLabel;
}
- (UIImageView *)wmImgView
{
if (!_wmImgView)
{
_wmImgView = ({
UIImageView * wmImgView = [[UIImageView alloc]initWithFrame:CGRectMake(self.frame.size.width - WGiveWidth(50),((self.frame.size.height - WGiveHeight(35/2.0))/2.0), WGiveWidth(35/2.0), WGiveWidth(35/2.0))];
wmImgView;
});
[self addSubview:_wmImgView];
}
return _wmImgView;
}这里用懒加载只是强迫症啦…其实在这意义不大.
通讯录页面的搭建(搜索栏今天没时间做了)
addressbook
这里需要排序,所以导入
#import "NSString+PinYin.h"这里就讲怎么排序的
NSArray * nameArr = @[
                        @{
                            @"name":@"马化腾",
                            @"imgName":@"avater.jpg"
                        },
                        @{
                            @"name":@"张小龙",
                            @"imgName":@"avater.jpg"
                        },
                        @{
                            @"name":@"乔帮主",
                            @"imgName":@"avater.jpg"
                        },
                        @{
                            @"name":@"库里",
                            @"imgName":@"avater.jpg"
                        }
                        ];

for(char i = 'A';i <= 'Z';i++)
{
    NSMutableDictionary * dic = [[NSMutableDictionary alloc]init];
    for (int j = 0; j < nameArr.count; j++)
    {
        NSDictionary * nameDic = nameArr[j];
        NSString * name = nameDic[@"name"];
        NSString * imgName = nameDic[@"imgName"];
        NSString * sectionName = [NSString stringWithFormat:@"%c",i];

        //属于这个组的nameArr
        NSMutableArray * currNameArr = [[NSMutableArray alloc]init];
        if ([[name getFirstLetter] isEqualToString:sectionName])
        {
            NSDictionary * currDic = @{
                                     @"name":name,
                                     @"imgName":imgName};

            [currNameArr addObject:currDic];
        }
    }

    if (currNameArr.count > 0)
    {
        [dic setObject:currNameArr forKey:@"nameArr"];
        [dic setObject:sectionName forKey:@"sectionName"];
        [_dataArr addObject:dic];
    }
}
总结一下就是:一个数组里面有N个字典,字典里面有一个字符串sectionName(组名),以及一个数组nameArr(该组名下符合的名字数组),名字数组里面有N个字典,这个字典里面有一个字符串name(名字)以及一个字符串imgName(图片名).
剩下的可以参考一下我之前写过的“TableView索引的简单使用”.
这里就加一个放大镜的添加方法
//加索引
- (NSArray *)sectionIndexTitlesForTableView:(UITableView *)tableView{

    //索引背景颜色
    tableView.sectionIndexBackgroundColor = [UIColor clearColor];

    //索引颜色
    tableView.sectionIndexColor = [UIColor colorWithRed:82/255.0 green:82/255.0 blue:82/255.0 alpha:1];

    NSMutableArray * arr = [[NSMutableArray alloc]init];

    //加放大镜
    [arr addObject:UITableViewIndexSearch];

    for (NSDictionary * dic in _dataArr)
    {
        [arr addObject:dic[@"sectionName"]];
    }
    return arr;
}
以及原生cell改变imageView大小的方法
NSDictionary * dic = _dataArr[indexPath.section - 1];

NSArray * arr = dic[@"nameArr"];

//当前cell的信息
NSDictionary * rowDic = arr[indexPath.row];

cell.imageView.image = [UIImage imageNamed:rowDic[@"imgName"]];

cell.textLabel.text = rowDic[@"name"];

UIImage *icon = [UIImage imageNamed:rowDic[@"imgName"]];

//修改icon尺寸
CGSize itemSize = CGSizeMake(WGiveWidth(36), WGiveWidth(36));
UIGraphicsBeginImageContextWithOptions(itemSize, NO,0.0);
CGRect imageRect = CGRectMake(0.0, 0.0, itemSize.width, itemSize.height);
[icon drawInRect:imageRect];
cell.imageView.image = UIGraphicsGetImageFromCurrentImageContext();

UIGraphicsEndImageContext();
好了今天就做到这了!明天将尽力完成剩下的主界面UI.
目前的代码(将持续更新直至完成)
如果你有建议或者疑问欢迎评论!
好文推荐:iOS开发之详解连连支付集成