"感觉回家了比工作还忙…:"

这两天完成的任务:
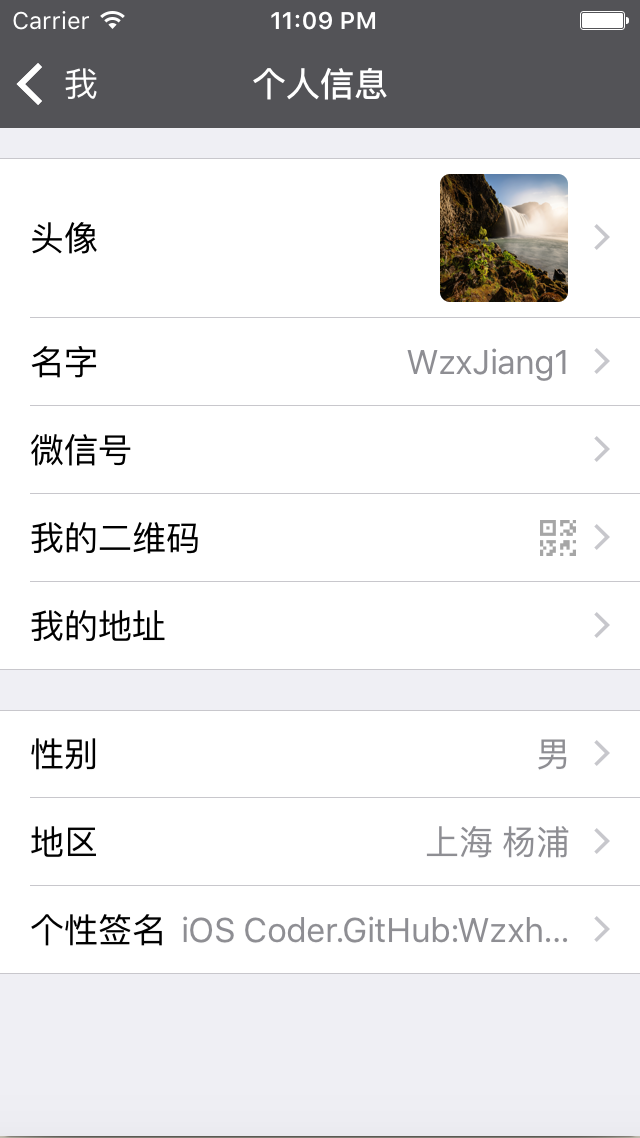
- 个人资料的修改(头像更改)
- 朋友圈的部分功能
效果图:

首先,终于弄懂一部分LearnCloud了…用AVUser替换了AVObject,方便了太多了,现在所有更新资料的方法都能写了.
挑重点讲吧!(这一块全是讲解LearnCloud的用法)
- AVUser
现在的注册代码简化成这样了,重名什么的都交给LearnCloud判断,好评!
AVUser * user = [AVUser user];
user.username = userName;
user.password = passWord;

[user signUpInBackgroundWithBlock:^(BOOL succeeded, NSError *error) {
    if (succeeded)
    {
        successBlock(nil);
    }
    else
    {
        failureBlock(error);
    }
}];
登录也简化太多了,获得的值存一份到本地缓存,为用户省点流量.
[AVUser logInWithUsernameInBackground:userName password:passWord block:^(AVUser *user, NSError *error) {
    if (user != nil)
    {
        //存入objectId
        NSString * objectId = [user objectForKey:@"objectId"];
        [[NSUserDefaults standardUserDefaults]setObject:objectId forKey:wUserID];
        NSLog(@"objectId:%@",objectId);

        NSDictionary * userDic = @{
                                 @"username":user.username,
                                 @"sex":[user objectForKey:@"sex"] == nil ?@"":[user objectForKey:@"sex"],
                                 @"wxID":[user objectForKey:@"wxID"] == nil?@"":[user objectForKey:@"wxID"],
                                 @"avaterUrl":[user objectForKey:@"avaterUrl"] == nil?@"":[user objectForKey:@"avaterUrl"]
                                 };

        [[NSUserDefaults standardUserDefaults]setObject:userDic forKey:wUserInfo];

        [[NSUserDefaults standardUserDefaults]synchronize];
        successBlock(nil);
    }
    else
    {
        failureBlock(error);
    }
}];
AVFile(用来存图片)
NSData *imageData = UIImagePNGRepresentation(img);
AVFile *imageFile = [AVFile fileWithName:@"image.png" data:imageData];
[imageFile saveInBackgroundWithBlock:^(BOOL succeeded, NSError *error) {

    if (succeeded)
    {
        AVUser *currentUser = [AVUser currentUser];
        currentUser[@"avaterUrl"] = imageFile.url;
        [currentUser saveInBackgroundWithBlock:^(BOOL succeeded, NSError *error){
            if (succeeded)
            {
                successBlock(imageFile.url);
            }
            else
            {
                failureBlock(error);
            }
        }];

    }

    } progressBlock:^(NSInteger percentDone) {

}];
然后讲讲上传头像中遇到的一个问题
刚开始上传的时候遇到了这么一个问题,我家光纤竟然上传头像要十几秒!
到最后发现,从本地取出来的时候没有压缩图片…当然不能上传原图到服务器.
压缩方法(百度的)
- (UIImage*)imageWithImageSimple:(UIImage*)image scaledToSize:(CGSize)newSize
{
    // Create a graphics image context
    UIGraphicsBeginImageContext(newSize);

    // Tell the old image to draw in this new context, with the desired
    // new size
    [image drawInRect:CGRectMake(0,0,newSize.width,newSize.height)];

    // Get the new image from the context
    UIImage* newImage = UIGraphicsGetImageFromCurrentImageContext();

    // End the context
    UIGraphicsEndImageContext();

    // Return the new image.
    return newImage;
}
选中图片的方法(我这里还用了MBProgressHUD来做进程指示器)
//当选择一张图片后进入这里
-(void)imagePickerController:(UIImagePickerController*)picker didFinishPickingMediaWithInfo:(NSDictionary *)info

{

    NSString *type = [info objectForKey:UIImagePickerControllerMediaType];

    //当选择的类型是图片
    if ([type isEqualToString:@"public.image"])
    {
        //        //先把图片转成NSData
        UIImage* image = [info objectForKey:@"UIImagePickerControllerOriginalImage"];
        UIImage * smallImage = [self imageWithImageSimple:image scaledToSize:CGSizeMake(128, 128)];
        //        //关闭相册界面
        [picker dismissViewControllerAnimated:YES completion:^{

        MBProgressHUD *hud = [MBProgressHUD showHUDAddedTo:self.view animated:YES];
        hud.label.text = @"正在上传头像";
        [[WWeChatApi giveMeApi]updataAvaterWithImg:smallImage andSuccess:^(id response) {

        NSDictionary * dic = [[NSUserDefaults standardUserDefaults]objectForKey:wUserInfo];
        NSMutableDictionary * muDic = [[NSMutableDictionary alloc]initWithDictionary:dic];
        [muDic setObject:response forKey:@"avaterUrl"];
        [[NSUserDefaults standardUserDefaults]setObject:[muDic copy] forKey:wUserInfo];
        [[NSUserDefaults standardUserDefaults]synchronize];

        [self preData];

    } andFailure:^(NSError *error) {

        NSLog(@"error:%@",error.localizedDescription);

        }];
    }];
    }
}
其他的没什么难的地方,点击头像弹出的View自定义的,没定义的特别高明(因为根据view获取viewcontroller没成功,所以就以功能优先写了个很普通的),有兴趣的看看就了解了。
朋友圈的部分功能
这里刷新组件有个很严重的问题,不会跟着位移旋转,因为不知道为什么,我用
_refreshView.transform = CGAffineTransformMakeRotation(<#CGFloat angle#>)
只要不是M_PI这一类的,其他的都会扭来扭去飞上天..
这里要是用人知道为什么,一定要指导下我啊!
- 下拉图片的效果
仔细观察一下可以发现tableview的头视图藏了一部分在导航栏下面,但是拖动指示器位置也在导航栏下面,那就不能通过tableview整体上移来解决了.
这里我是这么解决的:
- (UIView *)tableView:(UITableView *)tableView viewForHeaderInSection:(NSInteger)section
{
    UIView * view = [[UIView alloc]initWithFrame:CGRectMake(0, 0, self.view.frame.size.width, WGiveHeight(256))];

    //背景部分
    UIImageView * realView = [[UIImageView alloc]initWithFrame:CGRectMake(0, - WGiveHeight(64), self.view.frame.size.width, WGiveHeight(320))];
    realView.image = [UIImage imageNamed:@"Quan"];
    [view addSubview:realView];

    return view;
}
在头视图上加上一个frame为
CGRectMake(0, - WGiveHeight(64), self.view.frame.size.width, WGiveHeight(320))
的UIImageView,这样就可以完成这个效果.
- 刷新组件等我解决了旋转问题再讲解
个人资料页面的UI也是只用了原生的UITableViewCell, 有兴趣的看看代码就知道了(最后的个性签名高度还没处理)
cell = [[UITableViewCell alloc]initWithStyle:UITableViewCellStyleValue1 reuseIdentifier:identifier];
返回按钮的颜色通过在Appdelegate.m里面加这个方法就能改了
//返回按钮的颜色
[[UINavigationBar appearance] setTintColor:[UIColor whiteColor]];
好了!今天就到这了。
如果你有建议或者疑问欢迎评论!
好文推荐:菜鸟程序员2015年年终总结