"前几天搭建了好了聊天页面,着实花了一番功夫,毕竟是用的融云做的IM以及LeanCloud的服务器,很多应该服务器完成的算法要自己在客户端中完成。今天不讲我都用了哪些算法,只讲怎么搭建聊天页。如果你对我的方法有疑问或者有更好的办法,欢迎评论!:"
效果图:
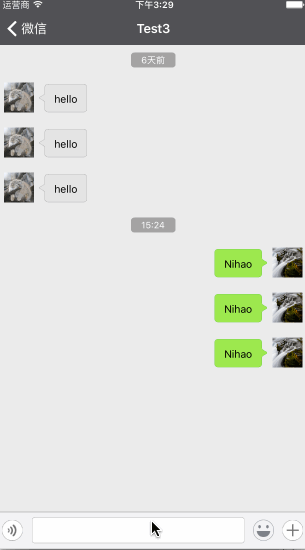
1、 下方的聊天栏的搭建

这里我用的自定义View来解耦,在View里面通过ShowBlock、HideBlock、SendBlock来让VC响应聊天栏出现、隐藏、发送信息的事件。 怎么获取键盘弹起隐藏的事件以及让聊天栏随之平滑的移动在上一篇已经说了自己写个WeChat(六)(做到现在遇到的一些问题)。
2、Cell应该怎么创建
在WWeChat我是这样创建聊天的Cell的:
可以看到我这有两个ImageView,我通过判断是我还是对方来隐藏一个ImageView。 这里因为高度不一定,所以拉约束的时候一定要以左上或右上为标准。
3、气泡应该怎么创建
气泡的起始X点、长度和高度不唯一,所以在Xib创建会很麻烦。
所以这里我是这样处理的:
在Cell.m中通过判断是否是我来手动创建气泡self.bubbleView
//如果是你
if (model.isMe)
{
[_AiConView removeFromSuperview];
    [_BiConView setImageWithURL:[NSURL URLWithString:[[UserInfoManager manager]avaterUrl]] placeholderImage:[UIImage imageNamed:@"avater.jpg"] completed:^(UIImage *image, NSError *error, SDImageCacheType cacheType) {

    }];
    self.bubbleView.frame = CGRectMake([UIScreen mainScreen].bounds.size.width - 40 - 10 - 5 - width,10,width,height);
    UIImage * bubbleImg = [UIImage imageNamed:@"SenderTextNodeBkg"];
    UIEdgeInsets insets = UIEdgeInsetsMake(30, 15,30,15);
    UIImage *insetImage = [bubbleImg resizableImageWithCapInsets:insets];
    self.bubbleView.image = insetImage;
}
else
{
    [_BiConView removeFromSuperview];

    self.bubbleView.frame = CGRectMake(10 + 40 + 5,10,width,height);
    UIImage * bubbleImg = [UIImage imageNamed:@"ReceiverTextNodeBkgHL"];
    UIEdgeInsets insets = UIEdgeInsetsMake(30, 15,30,15);
    UIImage *insetImage = [bubbleImg resizableImageWithCapInsets:insets];
    self.bubbleView.image = insetImage;
}
[self.contentView addSubview:_bubbleView];
这里还有个resizableImageWithCapInsets方法,这个就是控制气泡有哪些地方不被拉伸,这里填的值是根据图片真实像素来判断的。
UIEdgeInsets insets = {top, left, bottom, right};
然后再手动加上Label
UILabel * messageLabel = [[UILabel alloc]initWithFrame:CGRectMake(20, 3, _bubbleView.frame.size.width - 40, _bubbleView.frame.size.height - 12)];
messageLabel.font = [UIFont systemFontOfSize:14];

messageLabel.text = model.message;

messageLabel.numberOfLines = 0;

[_bubbleView addSubview:messageLabel];
3、Cell大小自适应
我用了一种非常取巧的办法来让Cell大小自适应。
我在MessageModel中加了bubbleSize属性
- (void)setMessage:(NSString *)message
{
_message = message;
self.bubbleSize = [self giveSizeForStr:self.message];
}
- (CGSize)giveSizeForStr:(NSString *)str
{
    UIFont * font = [UIFont systemFontOfSize:14.0];
    NSDictionary * dic = [NSDictionary dictionaryWithObjectsAndKeys:font,NSFontAttributeName,nil];
    CGSize size = [str boundingRectWithSize:CGSizeMake(200 - 20 - 20, MAXFLOAT) options:NSStringDrawingUsesLineFragmentOrigin attributes:dic context:nil].size;

    return CGSizeMake(size.width + 40, size.height + 20);
}
在model赋message的时候,计算这个Cell的高应该是多少。宽加40,高加20是考虑气泡内文字和气泡的边距。
然后在VC中:
- (CGFloat)tableView:(UITableView *)tableView heightForRowAtIndexPath:(NSIndexPath *)indexPath
{
    NSDictionary * dic = _dataArr[indexPath.section];
    NSArray * arr = dic[@"messages"];
    MessageModel * model = arr[indexPath.row];
    return model.bubbleSize.height > 40 ? model.bubbleSize.height + 20: 40+20;
}
设置这个气泡起码得有40px。这里加20是对气泡拉伸变形的补偿。
4、时间条的创建
这里我用的方法是通过算法分别把相差60秒以内的信息归到一个数组里,且加入过一个数组的不能加入第二个数组,然后设置每个组的头视图。
PS.对这个算法有兴趣的可以看下WWeChatApi里面的
- (void)getMessagesWithConversationID:(NSString *)conversationID andNum:(int)num andType:(RCConversationType)type AndSuccess:(void (^)(NSArray * messageArr))successBlock
andFailure:(void(^)())failureBlock
andError:(void(^)(NSError * error))errorBlock;
设置头视图的方法
- (UIView *)tableView:(UITableView *)tableView viewForHeaderInSection:(NSInteger)section
{
    UIView * headerView = [[UIView alloc]initWithFrame:CGRectMake(0, 0, self.view.frame.size.width, 40)];

    UILabel *timeLabel = [[UILabel alloc]initWithFrame:CGRectMake((self.view.frame.size.width - 60)/2.0, 10, 60, 20)];

    NSDictionary * dic = _dataArr[section];

    timeLabel.backgroundColor = [UIColor colorWithWhite:0 alpha:0.3];
    timeLabel.layer.cornerRadius = 5;
    timeLabel.clipsToBounds = YES;

    double times = [dic[@"timestamp"]doubleValue];

    timeLabel.text = [[WZXTimeStampToTimeTool tool]compareWithTimeDic:[[WZXTimeStampToTimeTool tool]timeStampToTimeToolWithTimeStamp:times andScale:3]];

    timeLabel.font = [UIFont systemFontOfSize:12];

    timeLabel.textColor = [UIColor whiteColor];

    timeLabel.textAlignment = NSTextAlignmentCenter;

    [headerView addSubview:timeLabel];

    return headerView;
}
这里的WZXTimeStampToTimeTool是我创建的一个快速把一个时间戳跟本地时间比较转换成字符串的工具类。
这里我是用double类型来取NSTimeInterval类型的时间戳,因为其他的数据类型比如NSInteger在5和5s上会出现被赋了一个错误的值(时间会显示46年前..1970年..)而double则是NSTimeInterval的本质。typedef double NSTimeInterval;
今天就讲这些了,如果你对其他地方有疑问,欢迎评论,下次我就拿出来讲解一下。
1
完整代码
如果你喜欢这个项目,欢迎Star、Fork~
好文推荐:菜鸟程序员2015年年终总结