一、前言
随着开发者的增多和时间的累积,AppStore已经有非常多的应用了,每年都有很多新的APP产生。但是我们手机上留存的应用有限,所以如何吸引用户,成为产品设计的一项重要内容。其中炫酷的动画效果是重要内容之一,我们会发现很多好的应用上面都有许多很炫的效果。可能一提到炫酷的动画,很多人都很头疼,因为动画并不是那么好做,实现一个好的动画需要时间、耐心和好的思路。下面我们就以一个有趣的动画(如下图)为例,抽丝剥茧,看看到底是怎么实现的!

编辑:Bison
投稿:HenryCheng
二、分析
上面图中的动画第一眼看起来的确是有点复杂,但是我们来一步步分析,就会发现其实并不是那么难。仔细看一下就会发现,大致步骤如下:
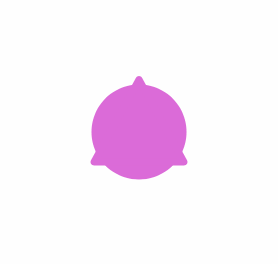
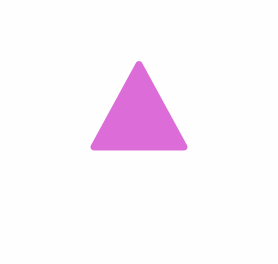
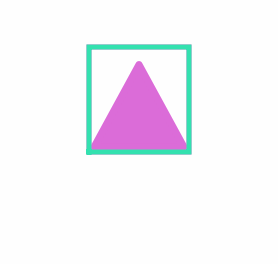
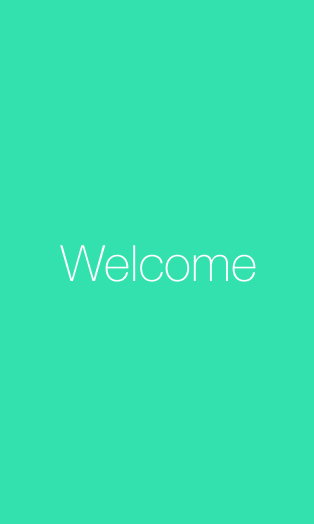
1、先出来一个圆 2、圆形在水平和竖直方向上被挤压,呈椭圆形状的一个过程,最后恢复成圆形 3、圆形的左下角、右下角和顶部分别按顺序凸出一小部分 4、圆和凸出部分形成的图形旋转一圈后变成三角形 5、三角形的左边先后出来两条宽线,将三角形围在一个矩形中 6、矩形由底部向上被波浪状填满 7、被填满的矩形放大至全屏,弹出Welcome 动画大致就分为上面几个步骤,拆分后我们一步步来实现其中的效果(下面所示步骤中以Swift代码为例,demo中分别有Objective-C和Swift的实现)。
三、实现圆形以及椭圆的渐变
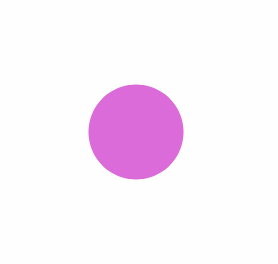
首先,我们创建了一个新工程后,然后新建了一个名AnimationView的类继承UIView,这个是用来显示动画效果的一个view。然后先添加CircleLayer(圆形layer),随后实现由小变大的效果。
 class AnimationView: UIView {

      let circleLayer = CircleLayer()

      override init(frame: CGRect) {
           super.init(frame: frame)
           backgroundColor = UIColor.clearColor()
           addCircleLayer()
       }

      required init?(coder aDecoder: NSCoder) {
           super.init(coder: aDecoder)
       }

      /**
       add circle layer
       */
      func addCircleLayer() {
           self.layer.addSublayer(circleLayer)
           circleLayer.expand()
       }
  }
其中expand()这个方法如下
/**
 expand animation function
 */
func expand() {
    let expandAnimation: CABasicAnimation = CABasicAnimation(keyPath: "path")
    expandAnimation.fromValue = circleSmallPath.CGPath
    expandAnimation.toValue = circleBigPath.CGPath
    expandAnimation.duration = KAnimationDuration
    expandAnimation.fillMode = kCAFillModeForwards
    expandAnimation.removedOnCompletion = false
    self.addAnimation(expandAnimation, forKey: nil)
}
运行效果如下
第一步做好了,接下来就是呈椭圆形状的变化了,仔细分析就比如一个弹性小球,竖直方向捏一下,水平方向捏一下这样的效果。这其实就是一个组合动画,如下
/**
 wobbl group animation
 */
func wobbleAnimate() {
    // 1、animation begin from bigPath to verticalPath
    let animation1: CABasicAnimation = CABasicAnimation(keyPath: "path")
    animation1.fromValue = circleBigPath.CGPath
    animation1.toValue = circleVerticalSquishPath.CGPath
    animation1.beginTime = KAnimationBeginTime
    animation1.duration = KAnimationDuration

    // 2、animation vertical to horizontal
    let  animation2: CABasicAnimation = CABasicAnimation(keyPath: "path")
    animation2.fromValue = circleVerticalSquishPath.CGPath
    animation2.toValue = circleHorizontalSquishPath.CGPath
    animation2.beginTime = animation1.beginTime + animation1.duration
    animation2.duration = KAnimationDuration

    // 3、animation horizontal to vertical
    let  animation3: CABasicAnimation = CABasicAnimation(keyPath: "path")
    animation3.fromValue = circleHorizontalSquishPath.CGPath
    animation3.toValue = circleVerticalSquishPath.CGPath
    animation3.beginTime = animation2.beginTime + animation2.duration
    animation3.duration = KAnimationDuration

    // 4、animation vertical to bigPath
    let  animation4: CABasicAnimation = CABasicAnimation(keyPath: "path")
    animation4.fromValue = circleVerticalSquishPath.CGPath
    animation4.toValue = circleBigPath.CGPath
    animation4.beginTime = animation3.beginTime + animation3.duration
    animation4.duration = KAnimationDuration

    // 5、group animation
    let animationGroup: CAAnimationGroup = CAAnimationGroup()
    animationGroup.animations = [animation1, animation2, animation3, animation4]
    animationGroup.duration = 4 * KAnimationDuration
    animationGroup.repeatCount = 2
    addAnimation(animationGroup, forKey: nil)
}
上面代码中实现了从 圆 → 椭圆(x方向长轴)→ 椭圆(y方向长轴)→ 圆这一系列的变化,最后组合成一个动画。这一步实现后效果如下

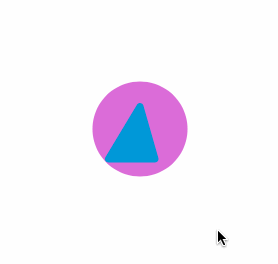
四、实现圆形边缘的凸出部分
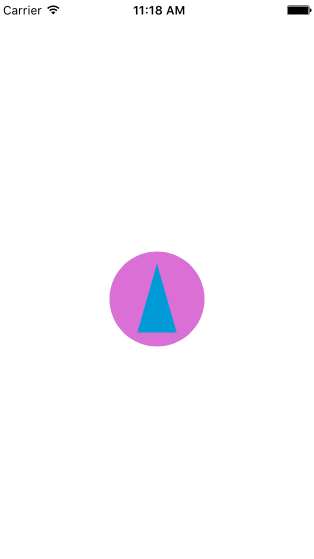
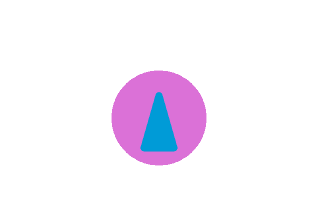
关于这个凸出部分,乍一看可能感觉会比较难实现,看起来挺复杂的。其实实现的原理很简单,仔细分析我们会发现这三个凸出部分连起来刚好是一个三角形,那么第一步我们就在之前的基础上先加一个三角形的layer,如下
import UIKit

class TriangleLayer: CAShapeLayer {

    let paddingSpace: CGFloat = 30.0

    override init() {
         super.init()
        fillColor = UIColor.colorWithHexString("#009ad6").CGColor
        strokeColor = UIColor.colorWithHexString("#009ad6").CGColor
        lineWidth = 7.0
        path = smallTrianglePath.CGPath
    }

    required init?(coder aDecoder: NSCoder) {
        fatalError("init(coder:) has not been implemented")
    }

    var smallTrianglePath: UIBezierPath {
        let smallPath = UIBezierPath()
        smallPath.moveToPoint(CGPointMake(5.0 + paddingSpace, 95.0))
        smallPath.addLineToPoint(CGPointMake(50.0, 12.5 + paddingSpace))
        smallPath.addLineToPoint(CGPointMake(95.0 - paddingSpace, 95.0))
        smallPath.closePath()
        return smallPath
    }
}
然后设置圆角
    lineCap = kCALineCapRound
    lineJoin = kCALineJoinRound
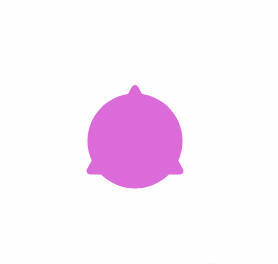
下面就是来做凸出部分了,原理其实很简单,就是将现在这个三角形保持中心不变,左边向左延伸即可
然后同理,保持中心不变分别按顺序向右和向上拉伸
具体过程是这样的
/**
 triangle animate function
 */
func triangleAnimate() {
     // left
    let triangleAnimationLeft: CABasicAnimation = CABasicAnimation(keyPath: "path")
    triangleAnimationLeft.fromValue = smallTrianglePath.CGPath
    triangleAnimationLeft.toValue = leftTrianglePath.CGPath
    triangleAnimationLeft.beginTime = 0.0
    triangleAnimationLeft.duration = 0.3
     // right
    let triangleAnimationRight: CABasicAnimation = CABasicAnimation(keyPath: "path")
    triangleAnimationRight.fromValue = leftTrianglePath.CGPath
    triangleAnimationRight.toValue = rightTrianglePath.CGPath
    triangleAnimationRight.beginTime = triangleAnimationLeft.beginTime + triangleAnimationLeft.duration
    triangleAnimationRight.duration = 0.25
     // top
    let triangleAnimationTop: CABasicAnimation = CABasicAnimation(keyPath: "path")
    triangleAnimationTop.fromValue = rightTrianglePath.CGPath
    triangleAnimationTop.toValue = topTrianglePath.CGPath
    triangleAnimationTop.beginTime = triangleAnimationRight.beginTime + triangleAnimationRight.duration
    triangleAnimationTop.duration = 0.20
     // group
    let triangleAnimationGroup: CAAnimationGroup = CAAnimationGroup()
    triangleAnimationGroup.animations = [triangleAnimationLeft, triangleAnimationRight, triangleAnimationTop]
    triangleAnimationGroup.duration = triangleAnimationTop.beginTime + triangleAnimationTop.duration
    triangleAnimationGroup.fillMode = kCAFillModeForwards
    triangleAnimationGroup.removedOnCompletion = false
    addAnimation(triangleAnimationGroup, forKey: nil)
}
我们接下来把三角形的颜色改一下
这里颜色相同了我们就可以看到了这个凸出的这个效果,调到正常速率(为了演示,把动画速率调慢了) ,联合之前所有的动作,到现在为止,效果是这样的

到现在为止,看上去还不错,差不多已经完成一半了,继续下一步!
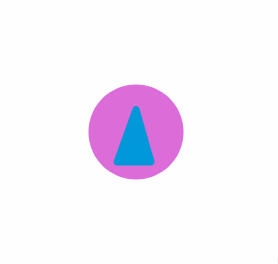
五、实现旋转和矩形
旋转来说很简单了,大家估计都做过旋转动画,这里就是把前面形成的图形旋转一下(当然要注意设置锚点anchorPoint)
/**
 self transform z
 */
func transformRotationZ() {
    self.layer.anchorPoint = CGPointMake(0.5, 0.65)
    let rotationAnimation: CABasicAnimation = CABasicAnimation(keyPath: "transform.rotation.z")
    rotationAnimation.toValue = CGFloat(M_PI * 2)
    rotationAnimation.duration = 0.45
    rotationAnimation.removedOnCompletion = true
    layer.addAnimation(rotationAnimation, forKey: nil)
}
旋转之后原图形被切成了一个三角形,思路就是把原来的大圆,按着这个大三角形的内切圆剪切一下即可
/**
 contract animation function
 */
func contract() {
    let contractAnimation: CABasicAnimation = CABasicAnimation(keyPath: "path")
    contractAnimation.fromValue = circleBigPath.CGPath
    contractAnimation.toValue = circleSmallPath.CGPath
    contractAnimation.duration = KAnimationDuration
    contractAnimation.fillMode = kCAFillModeForwards
    contractAnimation.removedOnCompletion = false
    addAnimation(contractAnimation, forKey: nil)
}
接下来就是画矩形,新建一个RectangleLayer,划线
/**
 line stroke color change with custom color

 - parameter color: custom color
 */
func strokeChangeWithColor(color: UIColor) {
    strokeColor = color.CGColor
    let strokeAnimation: CABasicAnimation = CABasicAnimation(keyPath: "strokeEnd")
    strokeAnimation.fromValue = 0.0
    strokeAnimation.toValue = 1.0
    strokeAnimation.duration = 0.4
    addAnimation(strokeAnimation, forKey: nil)
}
最后面就是经典的水波纹动画了,不多说,直接上代码
func animate() {
     /// 1
    let waveAnimationPre: CABasicAnimation = CABasicAnimation(keyPath: "path")
    waveAnimationPre.fromValue = wavePathPre.CGPath
    waveAnimationPre.toValue = wavePathStarting.CGPath
    waveAnimationPre.beginTime = 0.0
    waveAnimationPre.duration = KAnimationDuration
     /// 2
    let waveAnimationLow: CABasicAnimation = CABasicAnimation(keyPath: "path")
    waveAnimationLow.fromValue = wavePathStarting.CGPath
    waveAnimationLow.toValue = wavePathLow.CGPath
    waveAnimationLow.beginTime = waveAnimationPre.beginTime + waveAnimationPre.duration
    waveAnimationLow.duration = KAnimationDuration
     /// 3
    let waveAnimationMid: CABasicAnimation = CABasicAnimation(keyPath: "path")
    waveAnimationMid.fromValue = wavePathLow.CGPath
    waveAnimationMid.toValue = wavePathMid.CGPath
    waveAnimationMid.beginTime = waveAnimationLow.beginTime + waveAnimationLow.duration
    waveAnimationMid.duration = KAnimationDuration
     /// 4
    let waveAnimationHigh: CABasicAnimation = CABasicAnimation(keyPath: "path")
    waveAnimationHigh.fromValue = wavePathMid.CGPath
    waveAnimationHigh.toValue = wavePathHigh.CGPath
    waveAnimationHigh.beginTime = waveAnimationMid.beginTime + waveAnimationMid.duration
    waveAnimationHigh.duration = KAnimationDuration
     /// 5
    let waveAnimationComplete: CABasicAnimation = CABasicAnimation(keyPath: "path")
    waveAnimationComplete.fromValue = wavePathHigh.CGPath
    waveAnimationComplete.toValue = wavePathComplete.CGPath
    waveAnimationComplete.beginTime = waveAnimationHigh.beginTime + waveAnimationHigh.duration
    waveAnimationComplete.duration = KAnimationDuration
     /// group animation
    let arcAnimationGroup: CAAnimationGroup = CAAnimationGroup()
    arcAnimationGroup.animations = [waveAnimationPre, waveAnimationLow, waveAnimationMid, waveAnimationHigh, waveAnimationComplete]
    arcAnimationGroup.duration = waveAnimationComplete.beginTime + waveAnimationComplete.duration
    arcAnimationGroup.fillMode = kCAFillModeForwards
    arcAnimationGroup.removedOnCompletion = false
    addAnimation(arcAnimationGroup, forKey: nil)
}
找几个点控制水波形状,画出贝塞尔曲线即可,到这里基本就完成了。接下来最后一步,放大,并弹出Welcome
func expandView() {
    backgroundColor = UIColor.colorWithHexString("#40e0b0")
    frame = CGRectMake(frame.origin.x - blueRectangleLayer.lineWidth,
                       frame.origin.y - blueRectangleLayer.lineWidth,
                       frame.size.width + blueRectangleLayer.lineWidth * 2,
                       frame.size.height + blueRectangleLayer.lineWidth * 2)
    layer.sublayers = nil

    UIView.animateWithDuration(0.3, delay: 0.0, options: UIViewAnimationOptions.CurveEaseInOut, animations: {
        self.frame = self.parentFrame
        }, completion: { finished in
            self.delegate?.completeAnimation()
    })

}
放大完以后设置代理,然后在主的vc中添加Welcome这个Label
// MARK: -
// MARK: AnimationViewDelegate
func completeAnimation() {
    // 1
    animationView.removeFromSuperview()
    view.backgroundColor = UIColor.colorWithHexString("#40e0b0")

    // 2
    let label: UILabel = UILabel(frame: view.frame)
    label.textColor = UIColor.whiteColor()
    label.font = UIFont(name: "HelveticaNeue-Thin", size: 50.0)
    label.textAlignment = NSTextAlignment.Center
    label.text = "Welcome"
    label.transform = CGAffineTransformScale(label.transform, 0.25, 0.25)
    view.addSubview(label)

    // 3
    UIView.animateWithDuration(0.4, delay: 0.0, usingSpringWithDamping: 0.7, initialSpringVelocity: 0.1, options: UIViewAnimationOptions.CurveEaseInOut,animations: ({

            label.transform = CGAffineTransformScale(label.transform, 4.0, 4.0)
        }), completion: { finished in
            self.addTouchButton()
    })

}
到现在为止,动画全部完成
六、最后
同样,还是提供了两个版本(Objective-C & Swift),你可以在 这里 查看源码!
一直对动画比较感兴趣,希望多研究多深入,有什么意见或者建议的话,可以留言或者私信,如果觉得还好的话,请star支持,谢谢!